|
If you want your tables to have coloured borders in NOF, you can do that. As you will learn in this exercise, you can also do a lot more – it just takes a bit of extra fiddling around to do it.
Requirements for Coloured Borders
Traditionally, NOF has always treated Tables as standard HTML objects. NOF's Table Properties palette lets you set and alter cell borders, but you may need to think a little harder than usual to get
good results.
To get this to work, you must –
- Turn on CSS formatting
- Select the right cells to format
- Apply formatting with the Cell Properties Format button, Borders tab.
None of this is as complicated to do as it sounds.
Setting Up Coloured Borders
|
|
CAUTION: Don't try this on an existing table in a production site until you are sure you know what you're doing.
- Always make a template backup before you alter a production site.
|
The steps here may sound complex, but they will get easy with time (like riding a bicycle). Let's walk through this with a practice table.
To practice the skills we're looking at here, create a new page in a new site file. For our purposes, you don't care what to name the new site or what to name the new page.
On your practice page,
- Select the table tool, and drag to draw a table
- When the Create Table dialog opens, set 5 columns, 5 rows.
- On the Table Properties dialog, set Table border, Cell Padding and Cell Spacing, to 0 (Zero)
|
|
Be sure not to disable the Generate non-breaking spaces option. If you do, the table will collapse, and be very difficult to work with, even using the Object Tree.
|
Turning On CSS Formatting
Fancy table borders require CSS Formatting. To turn on CSS formatting, do the following:
- Select Tools, Options, Current Site
- In the Text formatting section, select, Cascading Style Sheets (CSS).
Setting the Correct Borders on the Correct Cells
Let's assume you want a Navy Blue border, three pixels wide, around all the table cells. Try this and see what happens:
- Select all the cells in the table
- On the third tab of the Cell Properties dialog, click the Format button.
- On the Object Format dialog, select the Borders tab.
- Under Border Settings, set Border, Style Solid, Width 3 px, Color #0000CC.
- Click OK.
- Preview or Local Publish the page.
You might think that by following the above steps that the table would get borders 3 px wide everywhere. And you would be almost right.
Unfortunately, you get a weird-looking table, with 3px outside borders, and 6px inside borders.
Identifying the problem
- The cells that intersect with other cells get inside borders of 3+3 px = 6 px.
- The outside borders of the table are OK at 3 px.
NOF produced exactly what you told it to do. Just like Word Perfect for DOS used to do in the old days…but I digress.
Solving the problem
We don't want the table to get double-width inside borders. To achieve this, set the correct borders on the correct cells.
|

|
|
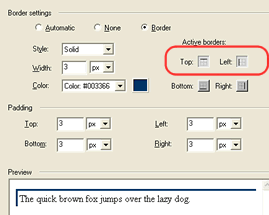
Figure 15 — Setting the top and left border only
|
|
Setting Properties. all cells
All cells need a top and left border.
- Select all the cells in the table.
- On Cell Properties, third tab, click Format.
- Set our blue border, 3px width on with top and left borders only as in Figure 15.
- Set 3px Padding on all sides.
- Click OK.
- Preview or local publish the page.
The table should look like Figure 16. Notice that most of the cells look fine, with a 3px border on all sides.
|

|
|
Figure 16 — Our table so far
|
Now we need to fix the last column and the last row.
|

|
|
Figure 17 — Adding the right border
|
|
Setting Properties, last column
To set the required properties for the last column,
- Select the last column
- On Cell Properties, second tab, click Format.
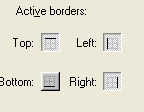
- On Object Format, third tab, add the blue border, on the right , leaving the top and left borders alone, as in Figure 17.
- Click OK.
The table should now have 3px borders everywhere except at the bottom of the last row.
Setting Properties, last row
Here's how to set the last row.
- Select the last row.
- On Cell Properties, second tab, click Format.
- On Object Format, third tab, enable the Bottom border, leaving the Top, Left and Right borders alone.
- Click OK.
The table should now have 3px borders everywhere except for the right border of the right bottom corner cell.
Setting Properties, right bottom corner cell
We're almost done. Let's fix that right bottom corner.
- Select the right bottom corner cell.
- On Cell Properties, second tab, click Format.
- On Object Format, third tab, enable the Right border, leaving the other borders alone.
- Click OK.
Now the table has a 3px border all around, and now you know how to make CSS borders on tables.
A final Caution
Be careful with CSS colours and graphics. If you use a CSS colour in one part of a table structure (border or background) and a graphic in another, the colours may not match.
This problem is especially noticeable on Macintosh systems. Due to technical differences between the way Macs and Windows systems render image gamma values, Windows-generated images often appear "washed out" when viewed on Macs.
Even on Windows systems, differences such as browsers and video drivers can make colour rendering highly unreliable. For best results –
- Don't mix and match CSS Colours with Graphics in your designs, or
- If you must, limit your CSS colours to ones that contrast with your graphics.
Otherwise, feel free to experiment, and have fun! (That's the best way to learn…)
|