|
Placing different banners on your web site projects is now a little different and the process has been improved to allow using only text as the banner without any graphic generated.
Create A Text Only Banner
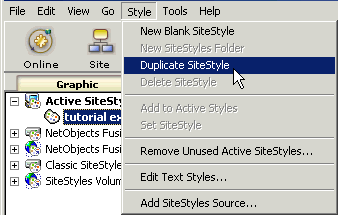
Click the Style View Icon to bring up your Style View workspace 
NOTE: Always create a new Site Style for every site you make.... ALWAYS.
 If you have not already done so make a duplicate style from the original NetObjects Fusion site style that you have been working with. If you have not already done so make a duplicate style from the original NetObjects Fusion site style that you have been working with.
The reason for this is so that you only make changes on the site style that you are using with a single site project. Several site projects can share the same style and getting into the habit of creating a duplicate style with the name of your site project will keep you from making changes on one site project and having them show on several other site projects where you DO NOT want these changes to take effect.
If you have several site styles showing in your active site folder, select Remove Unused Active SiteStyles from the menu choice above so that you only have your single site style showing. Sometimes if you have imported a site project as a template from an older version you will have a long list of unused site styles that come along with your template. Using this menu selection will clean up your Style View folder and make working in the new Style View much easier and enjoyable.
 Once you have made your duplicate style and renamed it the same as your site project and cleaned up your list of styles in the active site style folder. Once you have made your duplicate style and renamed it the same as your site project and cleaned up your list of styles in the active site style folder.
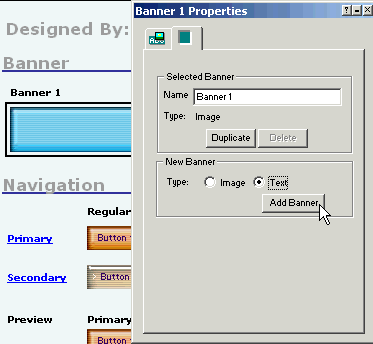
Click on the Banner graphic to bring up the Banner Properties palette.
Select the 2nd tab on the palette
check the box under NavBanner called Text.
Click the Add Banner button
A new banner will be created that is Text only
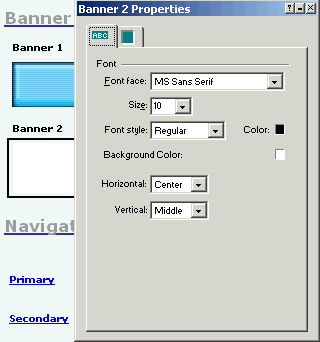
 Once the new banner is created click on it to bring up the Banner Properties palette for it. Once the new banner is created click on it to bring up the Banner Properties palette for it.
You will see that the Text Only banner properties palette is different from the graphic properties palette as it deals specifically with text formatting and not graphic formatting
You can set the font face, font size, font weight and style from the drop down box selections
If you click on the boxes beside the word Color you can set the font color and the background color that is used in the table that will be created to hold the text. If you do not wish to have the text stand out set the background color the same as your site background
You can position the text within the table anywhere you wish using the horizontal and vertical drop down box selections
The Banner name that is used is still taken from the custom Names input box on the Page Properties palette just like it is with graphic banners. Read a tutorial on where you set the your page naming
Did you find this tutorial useful? Would like to view all of our tutorials and support pages?
Join the NetObjects Fusion Users Group Community
This page was written by and is maintained by turtle
|