|
If you are familiar with using Cascading Style Sheets, you will know that you can place a border around page objects by creating a custom style.
I often use a style I call "boxed" - it looks like this:
.boxed {
BORDER-RIGHT: rgb(0,0,0) 1px solid;
PADDING-RIGHT: 10px;
BORDER-TOP: rgb(0,0,0) 1px solid;
PADDING-LEFT: 10px;
PADDING-BOTTOM: 10px;
BORDER-LEFT: rgb(0,0,0) 1px solid;
PADDING-TOP: 10px;
BORDER-BOTTOM: rgb(0,0,0) 1px solid
}
This text has had the above style applied to it
That's all very nice, but what if I wanted a border with rounded corners, like this:
|

|
|
Here is some text inside a rounded rectangle.
You can type as much text as you want in here and the rectangle will expand to fit the contents.
You can even put images inside!
How do they do that? Read On ...
|
|

|
|
Unfortunately, you can't create a custom CSS style for a border with rounded corners, so you'll have to do it with images and a table.
Here's how I did it:
First, you'll need to create two images for the top and bottom of the rectangle - I used Xara X to do mine, but any image editing program will do. You're welcome to pinch mine if you want - they are called topcurve.gif and botcurve.gif - just right-click them to save to your PC.
This is topcurve.gif - - right-click to save.
This is botcurve.gif - - right-click to save.
Now insert a table on your page, one column wide and three rows high. Drag it out so it's a bit wider than your images (about 320px in this case). Leave the default settings for now - we'll be changing them later.
In the top table cell, insert your image for the top of the rectangle, and in the bottom cell, insert the bottom image.
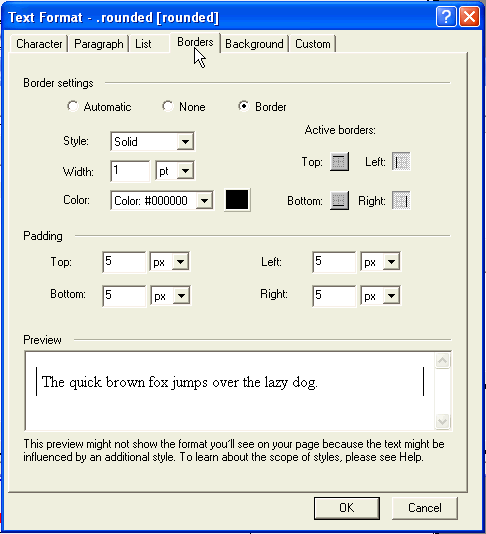
Now, create a new custom style (Text > Edit Text Styles) - I called it "rounded" - here's its code:
.rounded {
BORDER-RIGHT: rgb(0,0,0) 1pt solid;
PADDING-RIGHT: 5px;
PADDING-LEFT: 5px;
PADDING-BOTTOM: 5px;
BORDER-LEFT: rgb(0,0,0) 1pt solid;
PADDING-TOP: 5px
}
And here's a sceenshot of the style editor:
Notice that I have seleccted only the left and right borders. The border width and colour must match that of your images. Use some padding as shown to keep the text away from the borders.
This page is getting a bit long now, so click here to go on to the next page, where we'll put the finishing touches to the table.
This page was written and is maintained by Simon Lister.
|