Creating a Mals-E Store Using The Fusion Forms Tools
This tutorial assumes that you have already signed up for a Mals-E account. If you have not done so already, use this URL https://www.mals-e.com/join.php and sign up for an account so that you will receive the required information to place within your manually built store
We will go over how to create a Mals-E store using direct store coding which will give you much more flexibility than using the Fusion e-commerce component. using this method you can choose how many items you wish to display on a page and how many pages you want in your store.
First you will want to create a New Page to hold your store content. Give it a name such as Store-pg1 (you can later add additional pages by naming them Store-pg2, Store-pg3, etc and linking to them using smart links)
Make A Table To Hold Your Item
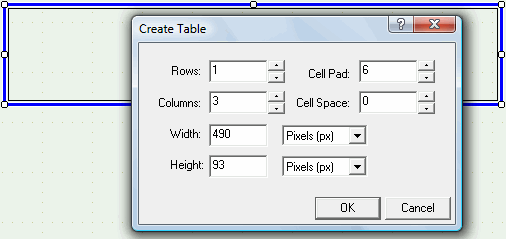
On your new store page select the Table Tool  and draw a rectangle and draw a rectangle
Our store example will be simple so select 1 row and 3 columns, Padding 6, spacing 0

Make The Table A Form
 On the Table Properties palette place a check in the box labeled "table is a form" On the Table Properties palette place a check in the box labeled "table is a form"
 Click on the Form Marker which is within the first cell of your table to bring up the Forms Properties palette. If you do not see the Form Marker You may need to turn lables on from the menu choice View and place a check in front of the option Page Labels Click on the Form Marker which is within the first cell of your table to bring up the Forms Properties palette. If you do not see the Form Marker You may need to turn lables on from the menu choice View and place a check in front of the option Page Labels
Enter Your Form, Store, And Item Information
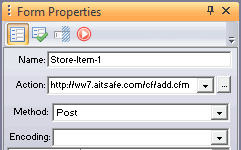
 The first thing you want to enter on the Form Properties palette is a Name for this item. I would suggest something like store-item-1. Then for the next one you create you can make it store-item-2, and so forth. As you add more items by creating more tables and forms just append a unique number to the form Name The first thing you want to enter on the Form Properties palette is a Name for this item. I would suggest something like store-item-1. Then for the next one you create you can make it store-item-2, and so forth. As you add more items by creating more tables and forms just append a unique number to the form Name
Next you will enter the Form Action. You will have received the URL for where your cart is located when you signed up. It will be http://ww#.aitsafe.com/cf/add.cfm where the # sign after ww is the actual number of the server where your cart is located. Enter this URL into the Form Action box.
Leave the form Method set to Post
Leave the Encoding option Blank
Now we will enter all of the Mals-E hidden coding that you were given when you created your cart on the Mals-E website. Since your description and price will be a text display, the actual cart info needs to be a hidden field. The description you send to Mals-E can be shorter and different from the text you show on your store page.
Mals-E uses the following special Field Names to process your store items so you will have to include them in your item info EXACTLY as they appear below
- userid - (hidden field - Your username)
- return - (hidden field - A URL for a return link, optional)
- product - (hidden field - the description of the product for the cart)
- price - (hidden field - Just the number, no currency symbol)
- qty - (A quantity, the default is 1, this is optional if you only allow 1 item)
Enter The Forms Hidden Fields
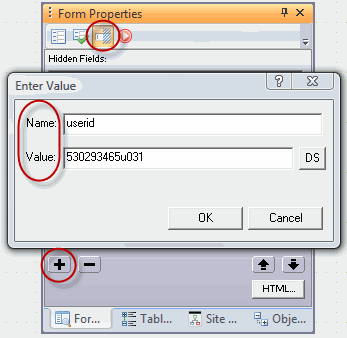
 Click on the Hidden Fields tab (the 3rd tab) Click on the Hidden Fields tab (the 3rd tab)
Press the Plus Sign (+) on the Forms Properties palette
In the Name field place userid. For the Value enter your Mals-E account number
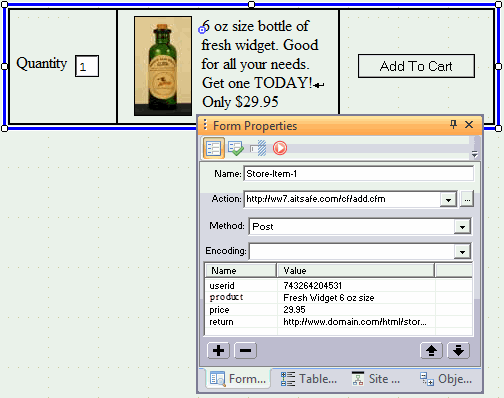
Press the Plus Sign (+) again and enter the next hidden name and value. Continue doing this until you have all of 4 the hidden fields entered (userid, product, price, and return). For Return use the FULL web URL of your store page (http://domain.com/html/store-pg1.html)
Add Price And Product To Table Cells
Now that you have all the hard part done, you can go into your table cells and enter the product information text, price, and an image for you product. You should place a quantity input box or drop down selection box (named qty) and add a submit button with Add To Cart as the text:

Adding Another Item
To add additional items to your page
- Click on the table holding your first item (When you see the Table Properties palette it is selected)
- Press CTRL + C to copy the table and all the form content to your windows clipboard
- Click below your first item table in page view to give Fusion the paste co-ordinance
- Press CTRL + V to paste a copy of your original table and form holding all of your Mals-E coding
- Change the Name of the form to your next item (Store-Item-2)
- Change the 2 hidden field Values for Product and Price. Do not change the name of the hidden fields userid and return as they will stay the same for all store items. To edit the values of your product and price double click on them in the list in the Form Properties palette
- Change the text description and image that is displayed in your table cells.
Do this as many times as you want items on a page. When you feel that you have enough on a page, create another page called store-pg2 and continue copy/pasting your form table on that page until you have enough, then continue onto page 3 then 4 then as many more as you need
You can link from 1 page to another using smart links or if you wish you can create a next previous with page numbers to go directly to a page of items
|
Did you find this tutorial useful?
Do you want to keep this resource online?
Make a donation to keep gotFusion alive
This page was written by and is maintained by turtle
|
|