Installing NetObjects Fusion from a Download
If you are running Windows Vista or Windows 7 you must have administration rights to install software. This tutorial assumes that you are the administrator on your computer or have administration rights to install software. If you do not have administration rights you cannot install software on your computer.
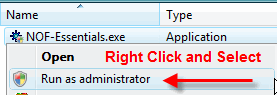
Open Windows Explorer and navigate to where you have saved the NetObjects Fusion program that you downloaded. Right click on the downloaded program and from the menu, select Run as administrator
When you see the Windows User Account Control User Access conformation dialog box, click on the Allow option to start the NetObjects Fusion installer
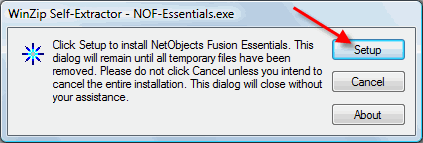
Click the Setup button on the Win Zip Self Extractor dialog box. The winzip self extractor dialog box will stay open until the software has finished installing and cleaned up the temporary location of all unpacked files. DO NOT CLOSE OR CANCEL the win zip dialog box. It will close on its own when finished. If you close this dialog box before it closes you will have a corrupted install of the product and you will have to start all over again.
 |
The download package will be unpacked to your windows temp folder and the installer will begin. Click the Next button on the welcome screen then the Yes button to accept the software EUL to continue the install. Complete the 2 registration dialog boxes making sure that you enter a valid email address as this is where the serial number for the product will be sent. The product will not run without a serial number and you will not receive one if you do not use a valid email address. You will immediatly be sent your serial number. Check your email as the next screen asks you to enter it. IF you did not use a valid email address click the back button and return to the registration screen and enter a valid email address as the serial number is inserted during the registration of the product.
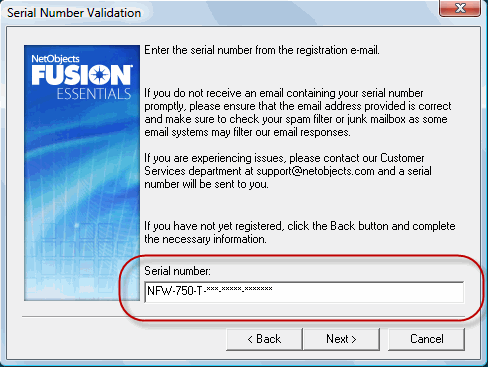 |
Once you enter the serial number and the product is validated you are asked where you wish to install the product. If you are not a power user it is best to accept the default install location as most tutorials and help you will receive will assume that you have the product installed in the default location. To accept the default location and start the install process, click the Next button.
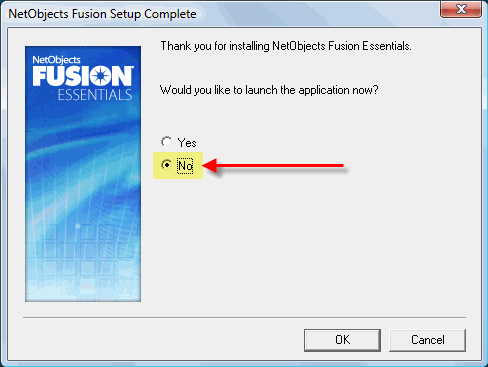
When you see the Fusion Setup Complete dialog box check the NO box and DO NOT RUN Fusion at this time. You will still see the winzip dialog box DO NOT PRESS CANCEL on this dialog box. Let it close on its one once Fusion has completed the install.
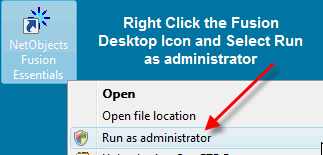
Now that you have Fusion installed you will see a desktop Icon that will start the program. The first time you run Fusion you must Right click on the desktop icon and select Run as administrator. This must be done so that the program has the proper permissions set to write to your computer. If you do not do this, you will find that many of the software features are disabled. If you find that you cannot use many of the software features you can at that time right click on the Fusion desktop icon and select Run as administrator to re-enable these features
You are all set and can start enjoying the ease of use this product provided for web authoring
If you have problems running Fusion under Vista and Windows 7 you may need to set the program file default to run as an administrator. Go over this tutorial on how to set the program default for the Fusion software to run with administrative privileges
|
Did you find this tutorial useful?
Do you want to keep this resource online?
Make a donation to keep gotFusion alive
This page was written by and is maintained by turtle
|
|